Cara
Clone hardisk via LAN menggunakan Clonezilla
Clonezilla is a free disaster
recovery, disk cloning, disk imaging and deployment solution.[3] Clonezilla is
designed by Steven Shiau and developed by the NCHC Free Software Labs in
Taiwan. Clonezilla SE provides multicast support similar to Norton Ghost
Corporate Edition.
Clonezilla Server Edition (SE)
- A single command is required to switch the client environment
- DRBL, FreeDOS, OS in local HD, memtest
- Linux network installation
- Not suitable for older machines and/or thin clients //NOTE// From version 5 (released ’07), fat client mechanism is supported in LTSP
Fundamental Diagram of Clonezilla.
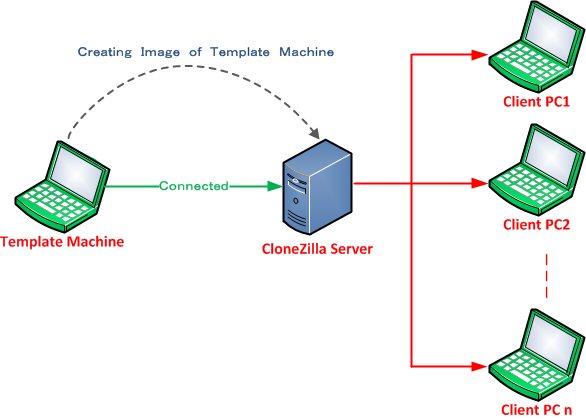
Figure: Image Cloning from Template
Client to Clonezilla Server
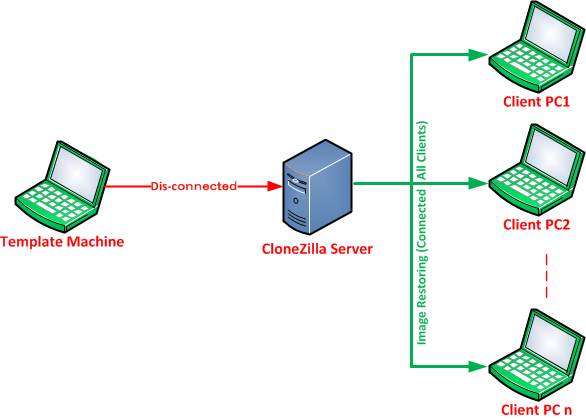
Figure: Restoring Image into Clients
from previously created image from Template machine.
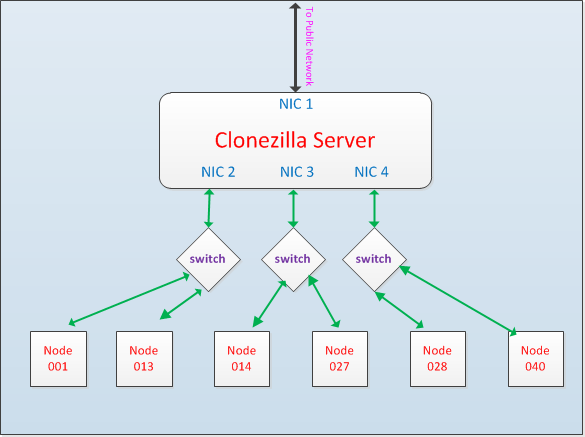
Network Setup for Linux Server
Install the GNU/Linux distribution
and configure all network cards. In the following, we use “eth0″ to connect the
Internet, while eth1, eth2, eth3 are for DRBL environment (set the network
card’s IP addresses to be private Ips (i.e. 192.168.x.x, the following example,
we set eth1:192.168.101.254, eth2:192.168.102.254, eth3:192.168.103.254…);
Please remember this principle, private IP (e.g. 192.168.x.x) is used for DRBL
environment.
#sudo vim /etc/network/interfaces
Edit the Following Lines.
# The loopback network interface
auto lo
iface lo inet loopback#Gateway -
auto eth0
iface eth0 inet dhcp
pre-up iptables-restore < /etc/iptables.rules
post-down iptables-save > /etc/iptables.rules#eth1
auto eth1
iface eth1 inet static
address 192.168.101.254
network 192.168.101.0
netmask 255.255.255.0
broadcast 192.168.101.255#eth2
auto eth2
iface eth2 inet static
address 192.168.102.254
network 192.168.102.0
netmask 255.255.255.0
broadcast 192.168.102.255
#eth3
auto eth3
iface eth3 inet static
address 192.168.103.254
network 192.168.103.0
netmask 255.255.255.0
broadcast 192.168.103.255
auto eth3
iface eth3 inet static
address 192.168.103.254
network 192.168.103.0
netmask 255.255.255.0
broadcast 192.168.103.255
Clonezilla Network
If you do not have multiple
Interface make virtual interface. Here it goes.
#Loopback
auto lo
iface lo inet loopback
auto lo
iface lo inet loopback
#Network Interface, this should
match your network
# Connect eth0 to internet.
auto eth0
iface eth0 inet dynamic
# Connect eth0 to internet.
auto eth0
iface eth0 inet dynamic
#Virtual Interface for Conezilla,
make sure you use a “class C” IP (192.168.x.x)
auto eth0:0
iface eth0:0 inet static
address 192.168.0.1
netmask 255.255.255.0
gateway 192.168.0.1
auto eth0:0
iface eth0:0 inet static
address 192.168.0.1
netmask 255.255.255.0
gateway 192.168.0.1
Restart network
sudo /etc/init.d/networking restart
CloneZilla Server Edition
Installation Steps
Initiall you need to import the GPG
key of the DRBL (Diskless Remote Boot in Linux, needed to boot the client
systems from the network (PXE) later on) and CloneZilla repository to do this
you need to follow me.
We add some repository list in
/etc/apt/sources.list
vim /etc/apt/sources.list
Add the DRBL/CloneZilla Debian
repository to it:
deb http://archive.ubuntu.com/ubuntu
maverick main restricted universe multiverse # (Or any Ubuntu mirror site near
you)
Run
apt-get update
afterwards.
Now we can install DRBL and
CloneZilla like this:
apt-get install drbl
Then we run
/opt/drbl/sbin/drbl4imp
Configure DRBL and CloneZilla with
default values.
*****************************************************.
This script is for those impatient,
it will setup the DRBL server by the default value which might not fit your
environment. Are you impatient ?
[Y/n] <– ENTER
*****************************************************.
Ok, Laziness is a virtue! Let us
setup DRBL server with the default values!!!
Press “Enter” to continue… <– ENTER
[...]
****************************************************
Enjoy DRBL!!!
NCHC Free Software Labs, Taiwan. http://free.nchc.org.tw
*****************************************************.
If you like, you can reboot the DRBL
server now to make sure everything is ready…(This is not necessary, just an
option.).
*****************************************************.
DRBL server is ready! Now set the
client machines to boot from PXE or Etherboot (refer to http://drbl.sourceforge.net for more details).
NOTE! If Etherboot is used in client
machine, version 5.4.0 or newer is required!
PS. The config file is saved as
/etc/drbl/drblpush.conf. Therefore if you want to run drblpush with the same
config again, you may run it as: /opt/drbl/sbin/drblpush -c
/etc/drbl/drblpush.conf
server1:~#
Installation process Ends here.
Create an Image of a Linux System
To create an image, we first start
CloneZilla on the Ubuntu/Debian system and tell it to store an image (the
server will then wait until a client connects to store the image), and then we
boot the client system of which we want to create the image from the network –
it should then boot into a CloneZilla Linux system that connects to the server
and creates the image.
Run
/opt/drbl/sbin/dcs
on the Ubuntu/Debian server and
select All Select all clients:

Next pick clonezilla-start Start_clonezilla_mode:

Choose save-disk Save client disk as
an image:

Select Later_in_client Later input
image and device name in client (you will then be prompted for an image name
later on the client, instead of having to provide an image name now):

On the next two screens you can
simply press ENTER to select the default values: 

Select the action when the client
finishes cloning (I want to shut down the client after the image has been
created, so I select -p poweroff):

Press ENTER again on the next two
screens to accept the default values:


Note: Leave default value.
Press ENTER again:

The server is now ready. Now start
the client system that you want to clone. It is important that you boot it from
the network (via PXE) – you might have to adjust the boot order in the client’s
BIOS so that it boots via PXE:

After you’ve configured the client
to boot from the network, you should see a DRBL boot menu. Select Clonezilla:
save disk (choose later) as image (choose later):

Next provide a name for the image
(or accept the default value):

Select the source hard drive:

Afterwards, the image is being
created and transferred to the CloneZilla server:

Then the CloneZilla server is
notified that the image creation process has finished…

and the client system is shut down
(or rebooted – that depends on the action you’ve chosen on the server):

That’s it, we now have an image of
our Linux system that we can clone to other systems.
4 Cloning/Restoring The Image
To clone or restore the image to other
systems, run
/opt/drbl/sbin/dcs
Select All Select all clients:

Choose clonezilla-start
Start_clonezilla_mode:

Select restore-disk Restore an image
to client disk:

You can accept the default values on
the next four screens by pressing ENTER:


Pick the image that you want to
restore:

Choose the target hard drive:

Select multicast multicast restore:

Choose clients+time-to-wait:

Fill in the number of systems on
which you want to restore the image (I want to restore just one system in this
example):

Fill in the max. time (in seconds)
that the server will wait until all clients are powered on (i.e., if you want
to restore the image on ten clients, you have 300 seconds to power on the other
nine computers after you have powered on the first one – if you are too slow,
CloneZilla will start to restore the image only on the systems that have been
powered on in time):

Afterwards, press ENTER twice:


Your Server side work is over.
Restoring Client
Now power on the clients. Make sure
they are configured to boot from the network (via PXE):

In the boot menu, select Clonezilla:
multicast restore or donot touch. Just power on your system and see for PXE
boot.

The cloning process will then begin:

Afterwards, the server will be
notified that the process has finished…

and the client system will reboot:

Before the client system boots,
enter its BIOS again and configure it to boot from the hard drive!
If all goes well, the computer
should boot into the cloned operating system.
See Also:
1. http://www.howtoforge.com/cloning-linux-systems-with-clonezilla-server-edition-clonezilla-se
2. http://clonezilla.org
3. http://drbl.sourceforge.net/
2. http://clonezilla.org
3. http://drbl.sourceforge.net/
source : http://drpaudel.com.np/?p=221
Leave
a Reply
Tidak ada komentar:
Posting Komentar